|
Why HydroSAVER
How It Works
Features & Benefits
Why is it Green
Installation & Operation
FAQ’s
Where to Buy
|
|
| |
|
| Testimonial |
1. Long Needed
"I couldn't believe what I saw when I received the notice on this product. I installed the two I bought and enjoy the freedom from cleaning and fishing. Bathroom sinks are famous for clogging because of the oils entering the sink. Also I have on several occasions have had to fish out a ring or other objects from the sink. Now cleaning and fishing are a snap. readmore>>
2. Great product
"This is a wonderful invention! So far no clogged drains! Just turn the valve every so often and you sink should never clog! Love the design and the tight fit with the other plumbing- no leaks either!" readmore>>
3. Great idea, Easy five minute install, Never clog!!!
Got this as a gift as requested. It took all of five minutes to install it, that includes getting a bucket to remove the existing p-trap, unscrew everything (no tools even needed), take out old p-trap, put this one in, screwed everything back on. readmore>>
4. Drained
I am a single woman with a single daughter who should have been moved out years ago! For years My bathroom sink would clog leading to use some very strong chemicals or calling on my boy friend to remove the drain and remove the debris. usually lots of hair. I ordered this and presented this task to my boyfriend who was skeptical at first but the knob impressed him. The installation was easy, readmore>>
5. It's awesome! Buy with your eyes shut!
Guess what! It's such a big peace of mind to know that your drain pipe is transparent. Even when I don't own a diamond ring that could get lodged there!
Even my very experienced grey-haired ARS guy the other day was awestruck when he saw that. "Where did you get that? It's amazing!" he remarked. It felt good that I was ahead of his other customers and readmore>>
6. Great for bathrooms
Like most men, I have facial hair that requires the occasional trimming/shaving/ shaping/modifying. I usually perform said maintenance over my bathroom sink. Unfortunately, everywhere I've ever lived and shaved at, the sink starts to clog. Doesn't matter if I diligently remove move of the hair and throw it in the trash, some works its way into the drain and readmore>>
7. Excellent product
I purchased 6 PermaFlow products to put into a new home. They work wonderfully. It is so helpful to have a visual of what is or is not in the drain! I recommend them to all my friends. Simple but effective! readmore>>
8. PermaFLOW Review
I read all of the reviews of this product, pro and con, including the responses by the manufacturer. I decided to order two of them to try. They were easy to install and haven't leaked a drop. I am going to order two more. To those who gave the product bad reviews, either you haven't tried them or you did something wrong. I think one of the problems some people have may be caused by over tightening. readmore>>
|
|
|
|
|
|
Installation Instructions
Installing the products included in the kit is pretty straightforward.Just follow the instructions provided. You need a couple of basic tools to install some of the water saver devices :
- Slip joint pliers, monkey wrench, strap wrench, or c-wrench.
- Thread sealing Teflon tape
SMARTFLOW™ EFFICIENT MASSAGING SHOWERHEAD
Traditional high flow rate showerheads waste thousands of gallons of water each year. Replacing your old showerhead with an efficient showerhead saves water while providing you with a relaxing and satisfying shower. This showerhead provides three spray settings: massage, regular, and combination spray.
The WaterSense® labeled water efficient design exceeds the national energy and water efficiency standards (ANSI/ASME Specification A112.18.1). |
 |
Installation Instructions:
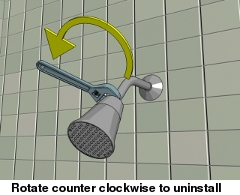
- Use a wrench or pliers to remove the existing showerhead from the shower arm by turning it counterclockwise.
- Wrap a thin layer of Teflon tape on the shower arm threads.
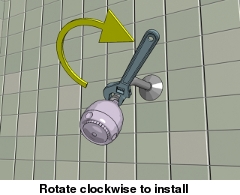
- Install the SmartFLOW™ showerhead onto the shower arm by turning it clockwise.
- Test for any leaks; repeat the steps if necessary.
Estimated annual water savings: Up to 7,500 gallons of water.
|
 |
TOUCHFLOW™ PREMIUM DUAL SPRAY SWIVEL KITCHEN FAUCET AERATOR
| This kitchen faucet aerator does everything you need your kitchen faucet to do using just 1.5 gallons per minute. You can switch between a single and multiple stream spray with an easy push or pull of the aerator head. A convenient Touch Flow design maintains water temperature and provides intermittent rinsing. The swivel design allows you to target the spray to needed areas. It fits both male and female thread kitchen faucets. The water efficient design exceeds the national energy and water efficiency standards (ANSI/ASME Specification A112.18.1). |
 |
Installation Instructions:
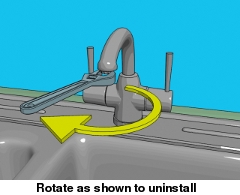
- To remove the old aerator from the kitchen faucet, use a wrench to turn it counterclockwise.
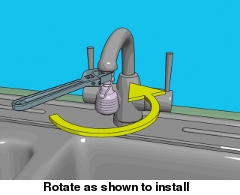
- Install the new aerator on the faucet by turning it clockwise and then tightening it with a wrench.
- Turn on the faucet to check for leaks. If it leaks, remove the faucet using the steps, add more Teflon tape, reattach the aerator, and check for leaks until leak stops.
Estimated annual water savings: Up to 7,500 gallons of water.
|
 |
MASTERFIT™ UNIVERSAL DUAL THREAD BATHROOM FAUCET AERATOR
| This water aerator improves flow performance, reduces splash, and saves water in bathroom sinks. It uses only 1.5 gallons per minute. The aerator is made of brass and fits both male and female bathroom faucet spouts. The WaterSense® labeled water efficient design exceeds the national energy and water efficiency standards (ANSI/ASME Specification A112.18.1). |
 |
Installation Instructions:
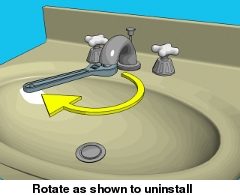
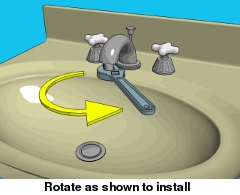
- To remove the old aerator from the kitchen faucet, use the wrench to turn it counterclockwise.
- Install the new aerator on the faucet by turning it clockwise and then tightening it with a wrench.
- If the threads on the spout are on the inside, use the thick washer in the new aerator.
- If the threads on the spout are on the outside, use the thin washer in the new aerator.
- Turn on the faucet to check for leaks. If it leaks, remove the faucet using the steps, add more Teflon tape, reattach the aerator, and check for leaks until the leak stops.
Estimated annual water savings: Up to 7,500 gallons of water.
|
 |
TOILET TANK FILLMAGIC™ DIVERTER VALVE
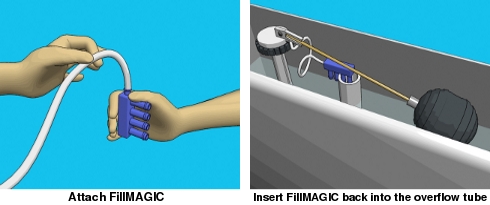
| The toilet tank and bowl fill at the same time, but they don't fill at the same rate the bowl fills faster. Because the fill valve doesn't shut off until the tank is full, water continues to be fed to the bowl. So, where does this extra water go? Straight down the drain! The Toilet Tank FillMAGIC™ Diverter Valve saves 0.5 to 1.5 gallons of water per flush by dividing the flow between the overflow tube and directing a portion of the flow into the toilet tank itself. This fills the toilet tank faster and reduces water loss through the bowl. The Toilet Tank FillMAGIC™ Diverter Valve is designed to install easily without tools. |
 |
Installation Instructions:
- Carefully remove the lid of the toilet tank.
- Pull the hose loose from the overflow tube (this is the small plastic hose that connects to the float valve and the overflow tube).
- Remove the clip or holder from the hose.
- Insert the Toilet Tank FillMAGIC™ Diverter Valve into the end of the hose.
- Push the Toilet Tank FillMAGIC™ Diverter Valve onto the overflow tube with nozzle #1 inside the tube and nozzles #2, #3, and #4 outside the tube.
- You may need to shorten the hose for a proper fit. (Use a knife or scissors.)
- If step 4 does not fill the bowl to its normal level after flushing, remove the Toilet Tank FillMAGIC™ Diverter Valve and reposition it with nozzle #2, #3, or #4 inside the overflow tube.
Estimated annual water savings: Up to 3,000 gallons of water.
|
 |
FLUSHSMART™ TOILET TANK OPTIMIZER™ BAG
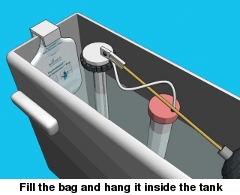
| The Toilet Tank Optimizer™ bag is a durable, low cost, maintenance free, and user-friendly toilet tank water saver. It is easy to install and is designed to hang on the inside of the toilet tank wall. It displaces and therefore saves up to 1 gallon of water per flush because the toilet tank never needs to refill the space occupied by the FlushSMART Optimizer bag. |
 |
Installation Instructions:
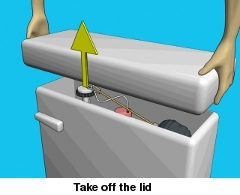
- Carefully remove the lid of the toilet tank.
- Using tap water, fill the Tank Optimizer all the way to the fill line.
- Use the flap to close the fill opening. This prevents water from evaporating.
- Lower the filled Tank Optimizer bag into the toilet tank between the tank wall and the intake valve.
- Hang the mounting bracket on the side wall as shown. The toilet optimizer can also be installed on the opposite wall of tank if it interferes with the toilet tank's internal mechanism.
- Place the lid back on the toilet tank.
Estimated annual water savings: Up to 4,000 gallons of water.
|
 |
FLAPPER LEAKDETECT™ TABLETS
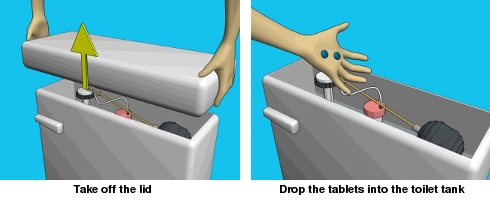
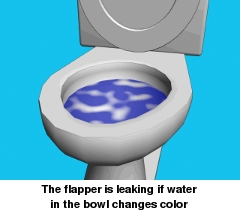
| A leaky toilet tank flapper is one of the most common causes of water loss in the home. Diagnosing leaky toilet flappers and replacing them in a timely manner can save thousands of gallons of water each year. Simply drop a tablet in the toilet tank. If the toilet turns blue, then you need to replace the flapper. Tablets contain only FDAcertified, non-toxic, non-carcinogenic pigments. |
 |
Installation Instructions:
- Take off the toilet tank lid.
- Pour in the contents of a toilet leak test.
- Wait for 15 minutes.
- If a blue color appears in the bowl, there is a leak in the flapper.
- Replace the flapper (not part of the kit) to fix the leak. You can find these at the hardware store very easily.
Estimated annual water savings: Up to 4,000 gallons of water.
|
 |
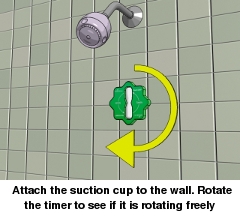
TIME-N-SAVE™ HOUR GLASS SHOWER TIMER
| Taking shorter showers is a great way to save water. This Time-N-SAVE™ five minute hourglass provides an easy way to monitor and reduce shower time. Simply turn over the timer on its suction cup backing to start your five minute countdown. |
 |
Installation Instructions:
- Identify the location to place your Time N SAVE™ Shower Timer.
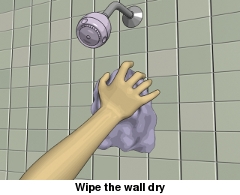
- Clean the shower and dry it off.
- Push the suction cup onto the wall.
- Rotate the timer to see if it is rotating freely. The timer is ready to use.
Estimated annual water savings: Up to 3,000 gallons of water.
|
 |
|
|